Instructions for Initializing the Konica-Minolta
Printer/Copy Machine Mailbox Options on Your PC.
↑ ↓ Preliminaries:
This is the procedure for Windows-based computers only. Installation on a Mac requires a different
procedure.
- Before beginning this procedure you must have installed the Konica-Minolta driver. If you have not done this, click to go to the Driver Installation instructions.
- Assuming that you have completed the Driver Installation, to continue you must log in to your PC as an administrator. Teachers should have local administrative control of their teacher laptops
via their normal login, so this should not be a problem.
- We have two Konica-Minolta Copier/Printer units. One is in the Mail Room (119)
and one is in the rear area of the Media Center (141).
- Following this procedure will give you the ability to use either one of these to drop documents into your copier account and print them when you go down to the copier.
- This procedure installs mailbox setups that can only be seen when you are logged in to YOUR computer under YOUR login. Other users will not be able to see your mailbox setups.
- Dana at the front desk will give you the User Name, Box Number, and Password information you need.
| Room #
| Description
| IP Address
|
| 119
| Mail/Work Room
| 10.190.130.125
|
| 141
| Media Center Rear Area
| 10.190.128.254
|
↑ ↓ Step 1:
Before beginning, you need to check whether the drivers have already been installed. To do this, click on
your "Start" menu and choose "Devices and Printers". This brings up the pane below.
- If you followed the Driver Installation instructions correctly you should see icons for both of the Konica-Minolta Printer copiers (room 119 and 141) as icons
- If you see any reference to "Konica Minolta bizhub pro 951" or "Konica Minolta 951" then the drivers have already been installed, and you are ready to start the mailbox setup.
- If you do not see a Konica-Minolta printer or see only a Konica-Minolta printer without room numbers, you should follow this entire procedure so that you are able to store documents in
your printer mailbox.
If you see separate icons for the printers in rooms 119 and 141 (which you should if you followed the driver installation instructions), then skip to step 11.

↑ ↓ Step 2:
Choose "Add a printer" as shown below.

↑ ↓ Step 3:
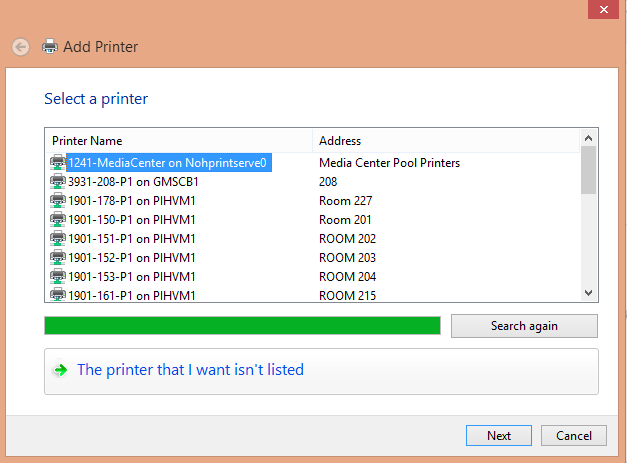
The "Add printer" panel appears. The printer that you want won't be listed, so select "The printer that I want isn't listed" and press "Next".
↑ ↓ Step 4:
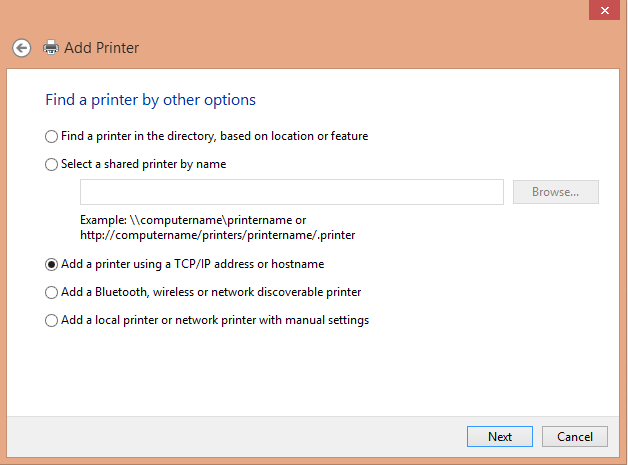
You will see a different "Add Printer" panel titled "Find a printer by other options". Select "Add a printer using a TCP/IP address or hostname. Then press "Next".
↑ ↓ Step 5:
You will be asked for the IP address of the printer. The picture assumes you are adding the printer/copier in room 141 (the work area of the Media Center) so the address to enter is as shown:
10.190.128.254
If you are instead adding the printer/copier in room 119 (the mail room), enter its IP address:
10.190.130.125
The port name should fill in the same address. Don't worry if the Port name has an underscore and a character or two after it. This just means that someone used this port before. No problem!
Make sure the Device type is set to Autodetect and the box is checked to Query the printer.
Press "Next".

↑ ↓ Step 6:
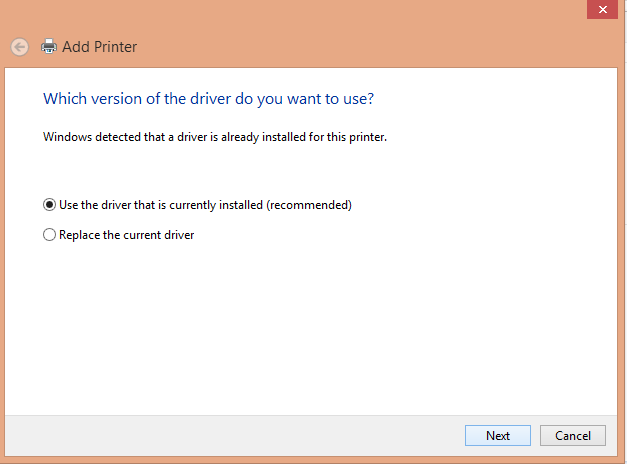
You want to use the driver that is currently installed. Make sure that is selected, then press "Next".
↑ ↓ Step 7:
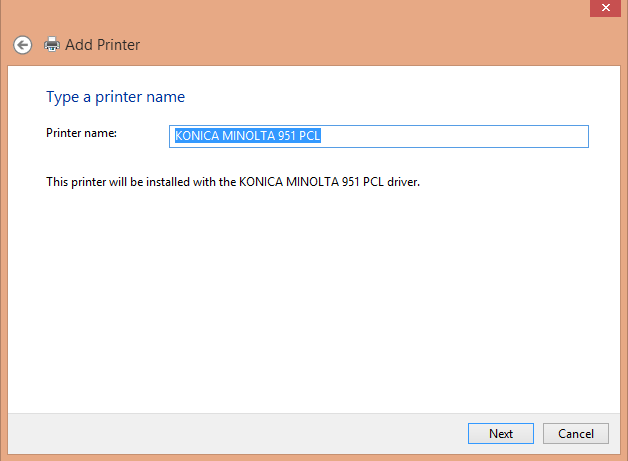
The system will suggest a fairly generic name, one that you probably don't want, because it doesn't include the room number. Do nothing, but continue to the next step.
↑ ↓ Step 8:
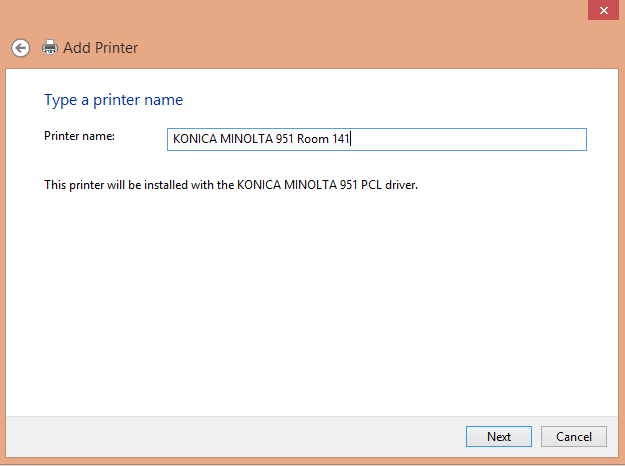
Type in a name that is more to your liking. My suggestion (assuming you are setting up the printer/copier in room 141) is what is shown below. Don't put in too long a name because when you choose a printer in the "Print" menu of applications it may only show the beginning of the printer name. Remember, these names are for you only, so suit yourself.
Press "Next".
↑ ↓ Step 9:
Congratulations! You have added the printer. If you don't want this to be your default printer, uncheck the box. Or not. You can change that later anyway.
DO NOT PRINT A TEST PAGE! You still have some work to do.
Press "Finish".

↑ ↓ Step 10:
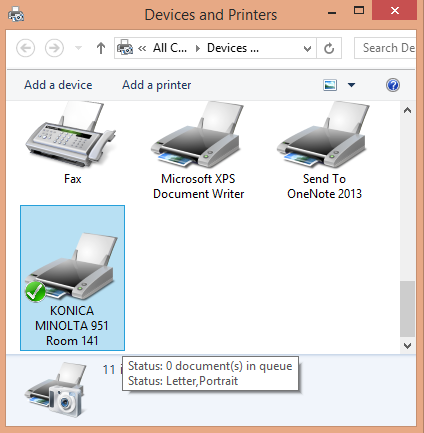
Back in the "Devices and Printers" panel you see the new printer you have added.
If you want to add another Konica-Minolta printer/copier, you can go back to step 2 later and add it. But let's finish what we have begun now.
Continue to the next step.
↑ ↓ Step 11:
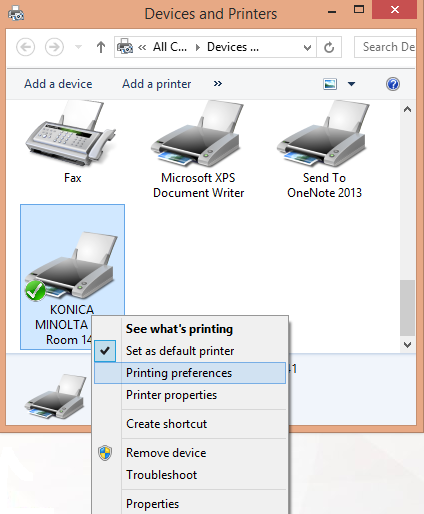
Right-Click the printer you just added (or wish to change if you jumped here from step 2). Choose "Printing preferences" and release the mouse button.
↑ ↓ Step 12:
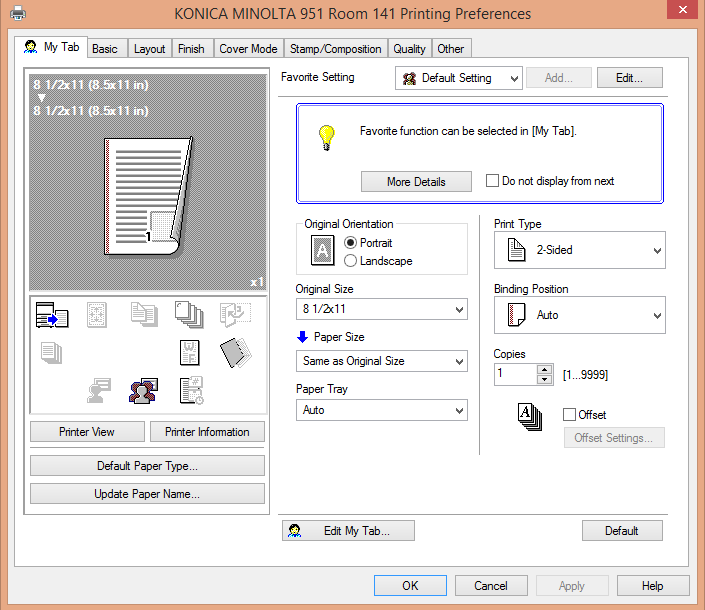
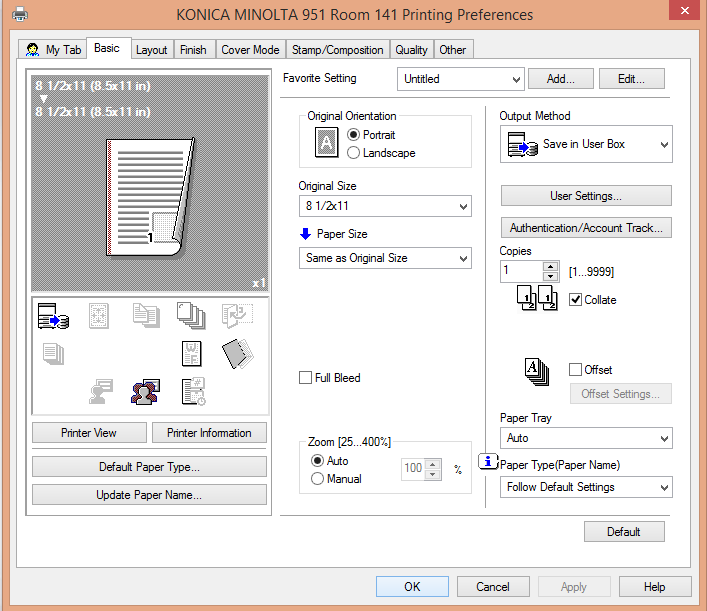
The "Printing Preferences" panel appears. Note the row of tabs at the top, which now has "My Tab" selected.
Click the "Basic" tab.
↑ ↓ Step 13:
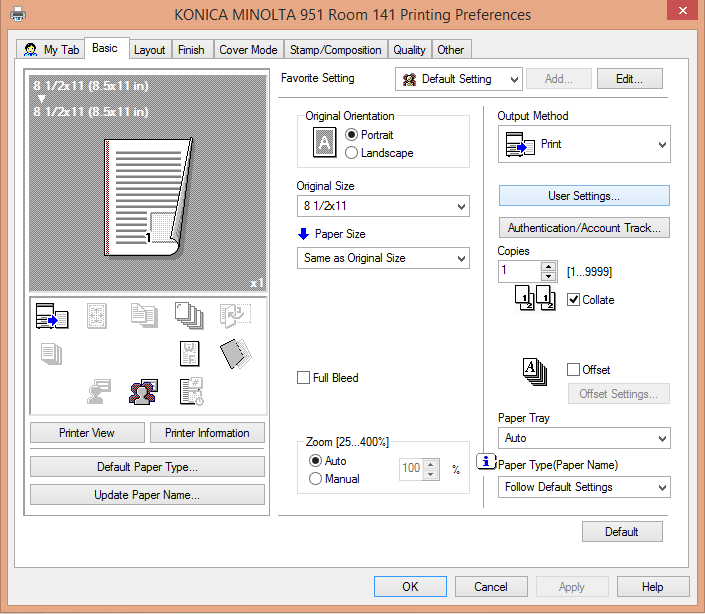
The "Basic" tab contains the options for use of the printer/copier and how print jobs are handled when they are submitted through an application's "Print" menu.
Continue to the next step.

↑ ↓ Step 14:
We will first set the "User Settings" under the button hilighted in blue.
Press the "User Settings" button.
↑ ↓ Step 15:
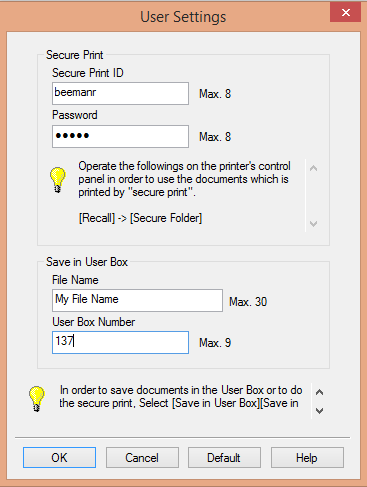
Type your information into the boxes on the "User Settings" Panel:
- Your Secure Print ID is the name of your mailbox on the printer. Mine is shown.
- Your Password is as per the information you will be given.
- The "File Name" is the name that your file will be given when you go to your mailbox while you are standing at the printer. You can change this if you want before submitting a job.
- "User Box Number" is in the information you will be given. Mine is shown. Use yours.
When you have entered these 4 items press "OK".
↑ ↓ Step 16:
You are now back to the "Printing Preferenes" panel. We did the "User Settings", and now need to attack the "Authentication/Account Track" which is the next button down.
Press the "Authentication/Account Track" button.
↑ ↓ Step 17:
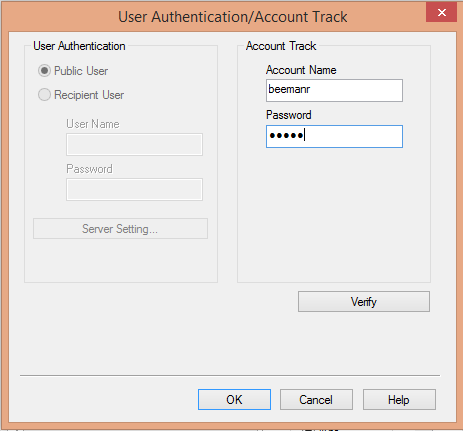
In the "User Authentication/Account Track" enter your "Account Name" (the name of your mailbox on the printer) and your Password, both of which are in the information you will be given.
Press the "Verify" button.
↑ ↓ Step 18:
If everything has been done properly and all the information is correct, you should receive a "Verification has succeeded" message.
Press "OK".

↑ ↓ Step 19:
Press "OK".
↑ ↓ Step 20:
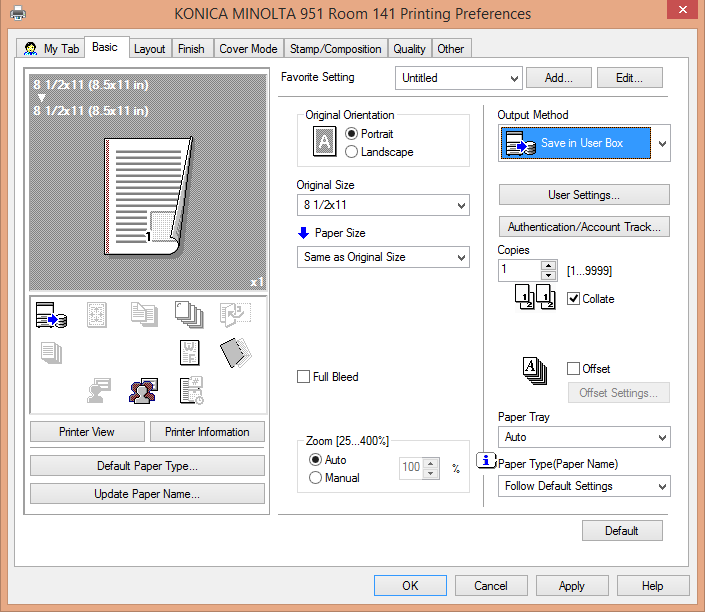
From the "Output Method" pulldown choose "Save in User Box".

↑ ↓ Step 21:
Release the mouse button and the "Save in User Box" item should be visible as shown below.
Go to the next step.
↑ ↓ Step 22:
You have completed the setup of your Printing Preferences and mailbox on the printer you selected back in step 11
You are now finished, unless you want to set up Printing Preferences on another Konica-Minolta printer/copier, in which case you need to go back to:
- Step 11 if you have already added but still need to set up another printer.
- Step 2 If you have another Konica-Minolta pringer/copier to add.
In any case, you now need to
Press "Apply", then
Press "OK".
↑
Ω