Instructions for Installing the Konica-Minolta
Printer/Copy Machine Drivers on Your PC.
↑ ↓ Preliminaries:
This is the procedure for Windows-based computers only. Installation on a Mac requires a different
procedure.
- Before beginning this installation you must log in to your PC as an administrator,
not as an ordinary user. Teachers should have local administrative control of their teacher laptops
via their normal login, so this should not be a problem.
- We have two Konica-Minolta Copier/Printer units. One is in the Mail Room (119)
and one is in the rear area of the Media Center (141).
- This tutorial assumes that you want the ability to use either one to drop documents into your copier account and print them when you go down to the copier.
- There is a separate tutorial describing how documents can be sent to your mailbox in one or both of the Konica-Minolta printers and printed when you go to the printer.
- Dana at the front desk will give you the User Name, Box Number, and Password information you need.
| Room #
| Description
| IP Address
|
| 119
| Mail/Work Room
| 10.190.128.101
|
| 141
| Media Center Rear Area
| 10.190.128.126
|
↑ ↓ Step 1:
Before beginning, you need to check whether the drivers have already been installed. To do this, click on
your "Start" menu and choose "Devices and Printers". This brings up the pane below. If you see any reference
to "Konica Minolta bizhub pro 951" or "Konica Minolta 951", as in the picture below, then the drivers have already
been installed.
In that case you can skip this tutorial and go directly to setting up your mailbox on the Konica-Minolta printers.

↑ ↓ Step 2:
Remember, you must be logged in to your PC as an administrator.
Teachers should have the required privileges via their normal login.
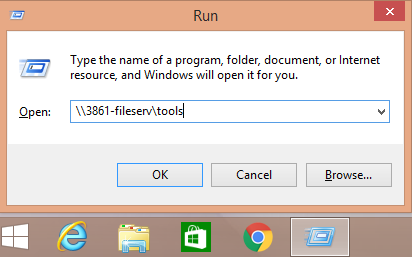
Go to your Windows Desktop. Press the "Windows" and "R" keys simultaneously.
This will bring up the window below. Type the following in the window, as shown:
\\3861-fileserv\tools
Click "OK".
↑ ↓ Step 3:
When the window appears scroll down to the File Folder labeled "Konica Minolta Drivers" and double-click the folder

↑ ↓ Step 4:
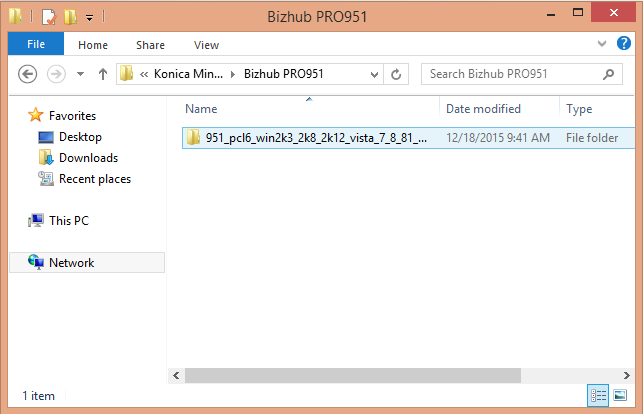
When the folder referenced above opens, find and double-click the folder labeled "Bizhub PRO951".

↑ ↓ Step 5:
The folder will open and expose another File Folder with a super-long name that starts with "951_pc16_win2k3_2k8_...".
Drag this folder to your desktop so that you have a local copy of it.
↑ ↓ Step 6:
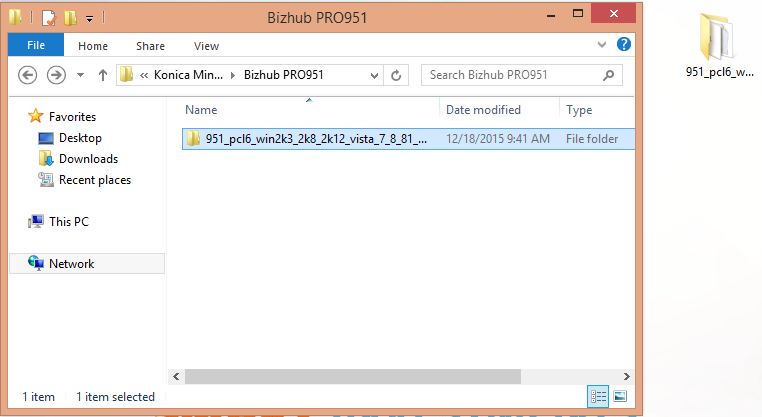
When you have dragged the folder to the desktop your computer will make a copy of it and its contents, which
you will see in the location to which you dragged it. In this picture it is to the right of the window from
which it came.
Once the copying process is complete you can click the server window (Bizhub PRO951) closed, as you don't need it anymore.
↑ ↓ Step 7:
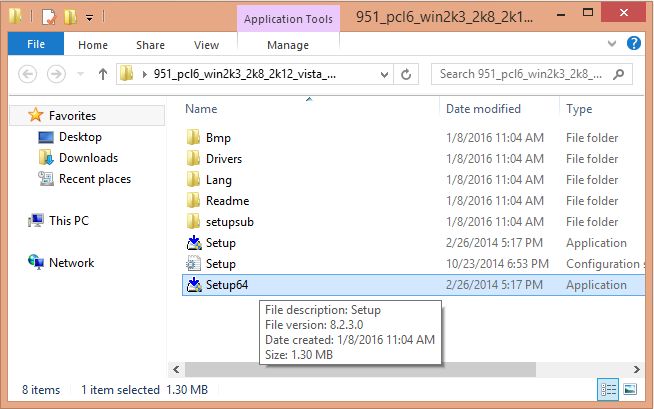
Double-click the file folder that you copied from the server in the previous step.
When the folder opens you will see, near the bottom of the list, two applications, each of which has a
downward-pointing blue arrow on its icon and which says "Application" in the "Type" column:
- Setup: If you are installing the drivers on a Dell computer, double-click "Setup".
- Setup64: If you are installing the drivers on a Lenovo computer, double-click "Setup64".
↑ ↓ Step 8:
A DIALOG BOX WILL APPEAR asking
"Do you want to allow the following program to make changes to this computer?"
Press the "Yes" button.
The "KONICA-MINOLTA Printer Installer - License Agreement" menu will then appear as shown below.
Press the "Agree" button.

↑ ↓ Step 9:
The "Select menu to setup" panel should appear.
Make sure the "Install printers/MFPs" button at the top is selected.
Also make sure the "Preference for IPv4" button is selected. IPv4 is the version of the Internet Protocol that
we use in the Broward Schools network. IPv6 is the newer protocol which is not widely used (yet) and which will
NOT work in our network.
Press "Next".

↑ ↓ Step 10:
The panel below will appear. After a short time, an alert will appear over this panel as shown in the next step.
No action needed on your part. Go to the next step.

↑ ↓ Step 11:
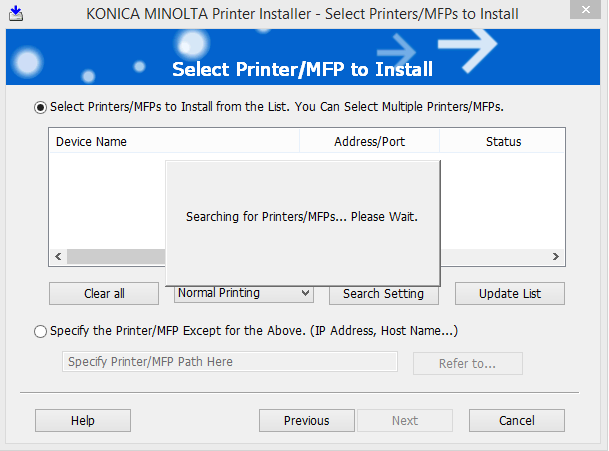
The alert "Searching for Printers/MFPs... Please Wait." will appear for a few seconds to a minute.
Do nothing and wait for the system to advance to the next step below.
↑ ↓ Step 12:
| Room #
| Description
| IP Address
|
| 119
| Mail/Work Room
| 10.190.128.101
|
| 141
| Media Center Rear Area
| 10.190.128.126
|
When the alert disappears, the data shown below for our two printers should be in the box as shown.
Make sure both items are checked.
Press the "Next" button.

↑ ↓ Step 13:
The "Selecting the installation setting" panel should appear. Make sure the information matches the picture
and that the checkbox is selected.
Press the "Next" button.

↑ ↓ Step 14:
| Room #
| Description
| IP Address
|
| 119
| Mail/Work Room
| 10.190.128.101
|
| 141
| Media Center Rear Area
| 10.190.128.126
|
The "Confirm installation settings" box will appear. It should have contents as shown.
Why is the driver language shown as "Japanese"? Its inscrutable.
Click "Install".

↑ ↓ Step 15:
| Room #
| Description
| IP Address
|
| 119
| Mail/Work Room
| 10.190.128.101
|
| 141
| Media Center Rear Area
| 10.190.128.126
|
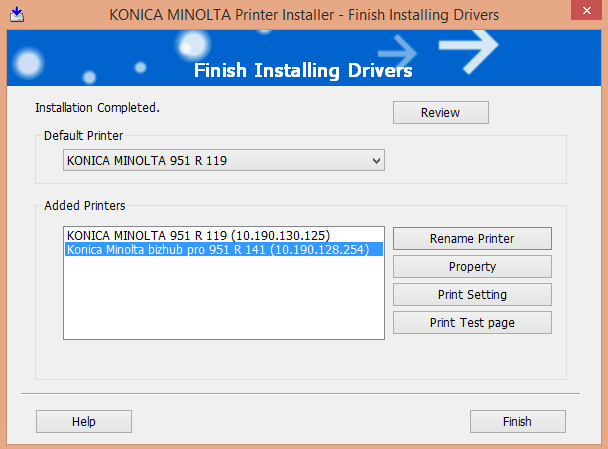
The "Finish Installing Drivers" panel allows you to give distinctive names to the printers as seen on the menus
on your computer. This is your chance to customize this.
I would suggest doing what I have done in the
slides below and include the room number in the printer name.
This does not affect how anyone else sees the printers.
If you want to rename a printer select it so that it is highlighted and press "Rename Printer" as shown below.
Otherwise press "Finish".

↑ ↓ Step 16:
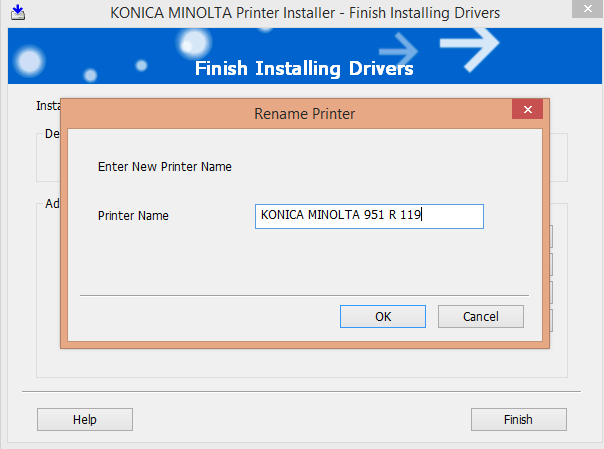
This is what you get when you press the "Rename Printer" in the previous step. Rename the printer in a way that is
meaningful to you, then press "OK".
↑ ↓ Step 17:
| Room #
| Description
| IP Address
|
| 119
| Mail/Work Room
| 10.190.128.101
|
| 141
| Media Center Rear Area
| 10.190.128.126
|
This is the printer renamed as per the previous step. You can rename another printer by selecting it and
Pressing "Rename Printer" again.

↑ ↓ Step 18:
| Room #
| Description
| IP Address
|
| 119
| Mail/Work Room
| 10.190.128.101
|
| 141
| Media Center Rear Area
| 10.190.128.126
|
We are now going to rename the printer in room 141, so we select it and press "Rename Computer" again.

↑ ↓ Step 19:
Here I have typed in a name that identifies the printer as being in room 141
You do likewise, then press "OK".

↑ ↓ Step 20:
| Room #
| Description
| IP Address
|
| 119
| Mail/Work Room
| 10.190.128.101
|
| 141
| Media Center Rear Area
| 10.190.128.126
|
Press "Finish". Your computer should restart. After that you can log in to your account and set up access
to your mailboxes on the printers.
There is another tutorial to help you with that.
↑
Ω